
Picture this: it’s a frigid January night, well below freezing. You're in the city, but far away a disaster is unfolding: the pipes in your cabin have frozen solid, cracked and are currently dumping litres of water onto the floor.
Frozen pipes are every cabin owner’s winter nightmare. Fortunately, there’s a handy solution to keep your water lines ice-free: heat tape. We’ll explain what heat tape is, how it works, and how to use it in a cabin or cottage setting. We’ll cover the different types of heat tape, where it’s best applied, how to install it step-by-step, safety tips (including common mistakes to avoid), and advice on when to turn it on or off and how to maintain it. Let’s dive in and make sure your cabin’s plumbing stays warm and flowing all winter long!

What Is Heat Tape and How Does It Work?
Heat tape (also known as heat cable or heat trace) is an electrical heating cable designed to prevent pipes from freezing by producing gentle heat along their length. Despite the name, it’s not a “tape” with adhesive; it’s a flexible, insulated wire that you attach to the outside of your pipes. When plugged into power, the cable warms up and transfers heat to the pipe, keeping the water inside from freezing solid. Heat tape typically plugs into a standard GFCI-protected outlet for safety, since it’s often used in damp areas like crawl spaces or outdoors.
How it works
Some heat tapes simply start heating when powered, while others have built-in thermostats or smart technology to heat only when needed. In any case, the principle is the same; they add a bit of warmth to your pipes to counteract freezing temperatures. This is especially useful in addition to regular pipe insulation. While heating the whole space and insulating your pipes is the first line of defence (and usually sufficient for short cold snaps), insulation alone may not prevent freezing during prolonged or extreme cold. Heat tape provides supplemental warmth in those deep-freeze conditions, which is why it’s a lifesaver for cabin owners in harsh Canadian climates.
Key features
Heat tape usually comes as a flat or round cable that runs alongside the pipe or is spiraled around it in a candy-cane stripe fashion. You secure it in place with electrical tape or zip ties (more on installation later). Importantly, you must never overlap or double-wrap heat tape on itself unless the manufacturer explicitly says it’s safe. Overlapping can cause the tape to overheat and can lead to shorts or even fire. Modern heat tape is safe for both metal and plastic pipes (check the label to be sure), but you need to use the right type for each scenario – which brings us to our next section.
Types of Heat Tape: Self-Regulating vs. Constant Wattage
Not all heat tapes are the same. The two main types you’ll encounter are self-regulating heat tape and constant wattage heat tape. Understanding the difference will help you choose the best option for your cabin:
Self-Regulating Heat Tape
This type automatically adjusts its heat output based on the surrounding temperature. In simple terms, it senses how cold it is and produces more heat when it’s frigid outside and less heat when it’s milder. Above freezing, it might emit very little heat, and as the temperature drops, it cranks out more warmth. No manual thermostat adjustment is needed – it self-regulates. The magic happens through a special conductive core that increases resistance as it warms up, thus cutting down the current (and heat) in warmer conditions. This makes self-regulating tape energy-efficient and safer: it won’t overheat your pipes, and it won’t waste as much electricity during warmer periods. You can often cut self-regulating cable to the exact length you need, and it’s usually safe for both plastic and metal pipes by design. Many cabin owners love the “set-and-forget” nature of self-regulating heat tape – you can plug it in at the start of winter and it will do its job without constant supervision, only drawing power when necessary.
The downside? It tends to be more expensive up front than constant wattage tape, but it may save money on power (and headaches) in the long run.
Constant Wattage Heat Tape
This type of heat tape provides a steady, constant heat output along its entire length whenever it’s powered on. Think of it like an electric blanket that’s either on or off, with full heat when on. Many basic heat tape kits fall into this category – they often include a small built-in thermostat or temperature sensor that turns the cable on or off at preset temperatures (for example, on at ~3 °C and off at ~10 °C). These are sometimes called “thermostat-controlled” heat tapes. Essentially, when the temperature drops low enough, the thermostat clicks on and the cable heats at full power (often around 5–10 watts per foot of cable), and when it’s warmer, it shuts off. Constant wattage cables are simpler and usually cheaper than self-regulating ones, making them popular for DIY use. They come in fixed lengths (common kits range from a few feet up to 60+ feet, with a plug attached). If your heat tape is the constant wattage type without an automatic thermostat, you’ll need to remember to plug it in or switch it on when freezing weather hits, and turn it off when it warms up. For safety, manufacturers strongly recommend using constant wattage cables with a thermostat on plastic pipes. A non-thermostat “always on” cable could overheat a plastic (PVC/PEX) pipe, especially if the pipe is also insulated, potentially causing damage. With metal pipes, constant output cables are less risky, but you still must install them correctly.
Which one to choose?
It often depends on your needs and budget. If you want a plug-and-forget solution and are willing to pay a bit more, a self-regulating cable is fantastic (it’s commonly used in heavy-duty and even industrial applications because of its reliability and because you don’t have to babysit it). If you’re on a budget or have a shorter pipe run to protect, a constant wattage kit with a built-in thermostat can work just fine; you just need to be a bit more mindful about operation. Many cabin owners in mild parts of Canada use the inexpensive kits; those in extremely cold areas or off-grid might opt for self-regulating to conserve energy. Either way, make sure the product is rated for the type of pipe you have and the low temperatures you expect. For example, some automatic heat cable kits claim to keep water flowing even at –40°C, which covers the worst of a Canadian cold snap. Also check the power usage: a typical constant-wattage heat tape might draw around 5–7 watts per foot of length, so a 30-foot cable uses ~210 watts when on. Knowing that helps you estimate the impact on your electric bill.
Ideal Use Cases for Heat Tape in Cabins and Cottages

How do you know if you should use heat tape in your cabin? Here are some ideal scenarios where heat tape can be a pipe-saver (especially relevant for cabins, cottages, and other seasonal or off-grid structures where pipes might be exposed to the cold):
Exposed or Vulnerable Water Pipes
Any water supply pipes that run outside or along uninsulated areas are prime candidates. For instance, the section of pipe running from your well or lake intake into the cabin, or pipes running under a cabin that’s up on piers, can freeze quickly in subzero weather. Heat tape is commonly applied to exterior water supply lines and shutoff valves in mobile homes and cabins to prevent freezing. Even indoor pipes that run against an outside wall (like under a kitchen sink on a cabin’s outer wall) might freeze if it’s cold enough; a short length of heat tape there can save you from a burst pipe.
Crawl Spaces and Unheated Basements
Many cottages have only a crawl space or none at all, and plumbing may be routed through these cold areas. If your pipes in the crawl space are not buried below frost line or not heavily insulated, heat tape can be used to keep them from freezing. Essentially, any part of your plumbing that sees winter air temperatures could benefit from heat tape. This includes pipes in unheated attics, garages, or pump houses too.
Seasonal Cabins Converted to Winter Use
If you own a cabin that was originally a three-season cottage but you want to use it in winter, the plumbing may not have been built with -30 °C in mind. Heat tape is a practical retrofit for pipes that were fine in autumn but won’t survive a deep freeze. For example, perhaps your cabin’s bathroom lines run in an outer wall with minimal insulation; adding heat tape along those pipes (and insulating over the tape) can prevent an off-season disaster.
Outdoor Utilities and Hoses
While standard heat tape is meant for fixed pipes, there are related solutions for things like RV water hoses or above-ground temporary water lines. (Those are usually heated hoses or in-pipe heating cables rather than a tape you wrap, but they operate on the same principle.) If you have an outdoor barrel or water tank with a spigot that freezes, there are heat tape applications for that as well. In general, whenever draining the water out of a line isn’t feasible and you need water to keep flowing in freezing weather, heat tape is the go-to solution.
Keep in mind that heat tape is mainly used for freeze prevention, not for actively thawing out a solidly frozen pipe (though it can sometimes help thaw a pipe if applied carefully). If your scenario involves severe cold and critical water lines, integrating heat tape with insulation and other winterizing steps is a smart move.
Step-by-Step Guide: Installing Heat Tape on Your Pipes

Installing heat tape is a fairly straightforward DIY project, but it’s important to do it properly for it to work safely and effectively. Here’s a step-by-step guide to get you through the process:
- Choose the Right Heat Tape: Start by selecting a heat tape that suits your needs. Decide between self-regulating or constant-wattage as discussed above. Check the manufacturer’s recommendations to ensure the tape is approved for your pipe material (metal or plastic) and for the environment (indoor vs. outdoor use, temperature rating, etc.)
- Measure the length of pipe you need to cover and get a tape long enough (it’s okay if the cable is a bit shorter than the pipe – you can focus on the most critical section – but ideally it covers the full run of exposed pipe). If you’re using a cut-to-length style heat cable, you may need to also purchase an end connection kit separately; pre-assembled kits come with the length fixed and a plug attached. Also, plan how you will reach a power source – you’ll need a nearby GFCI outlet or have an electrician wire one if none is available.
- Prepare the Pipe: Before attaching the heat tape, do a little prep work:
- Turn off the water flow (if practical): This is more for safety during installation and to avoid any mishaps. If you can’t shut the water easily, you can still install the tape on a live pipe, but be cautious.
- Inspect and fix issues: Check the pipe for any leaks or damage. Heat tape shouldn’t be applied over leaking pipes; not only can the leak ruin your insulation, but water on an electric tape is a bad combo. Tighten any joints and repair leaks before proceeding.
- Clean the pipe surface: Wipe off dirt, dust, or grease from the pipe. A clean, dry surface helps the heat tape make good contact. If the pipe is metal and very cold/damp, try to dry it off so your tape and any thermostat sensor will adhere properly.
- Attach the Heat Tape Along the Pipe: Now comes the main event – attaching the cable.
- Position the heat tape: Start at the end of the pipe nearest to the power source, because most heat tapes have the plug at one end. If using a pre-made kit, begin at the plug end near the outlet. Run the cable straight along the pipe or spiral-wrap it around the pipe as directed by the manufacturer. Many tapes can simply be laid straight along the underside of a horizontal pipe (gravity will help heat rise around the pipe). For extra cold areas, a spiral wrap gives more coverage, but be sure to space the coils according to instructions – typically a spiral wrap looks like a candy cane stripe along the pipe.
- No overlapping: Avoid crossing the cable over itself or bunching it up in one spot. If you need to double back at the end of a pipe, some kits allow a very short overlap, but generally keep wraps spaced apart (e.g. 6″ spacing on a spiral). Overlapping can cause dangerous overheating.
- Secure the tape: Use electrical tape (the plastic insulating kind) or the clips that came with the kit to attach the heat tape to the pipe at intervals. A common practice is to put a short wrap of electrical tape every 12 inches or so to hold the cable in place. Do not use metal wire, metal clamps, or metal zip-ties directly on the heat tape – metal can damage the heating element or create a short. If you prefer zip ties, use plastic ones and don’t cinch them so tight that they cut into the cable. Ensure the heat tape lies flat against the pipe along its whole length.
- Install the Thermostat (if applicable): Many heat tape kits (especially constant wattage types) come with a small thermostat module – usually a little bulge or box on the cable, or a separate sensor on a lead. If your cable has a built-in thermostat, make sure that part is placed against the pipe (often you tape it tightly to the pipe) and located at the coldest point of the pipe. Commonly, you’d put the thermostat sensor on the north side of the house or wherever the wind hits, or simply on the end of the run furthest from where any building heat might reach. This way it detects the true cold and turns on at the right time. If you bought a separate thermostat controller, follow its instructions to wire it in and attach the probe to the pipe. The idea is the thermostat reacts to pipe temperature, not the air inside a heated room, so don’t leave it dangling in a warm spot.
- (Optional) Add Pipe Insulation Over the Heat Tape: This step depends on the type of heat tape and manufacturer guidelines, but in many cases you’ll want to insulate the pipe after installing the heat tape. Adding insulation (like foam tubing or fibreglass wrap) over the pipe and cable helps retain the heat that the tape produces, so you use less electricity and the pipe stays uniformly warm. Typically, foam rubber or polyethylene pipe insulation is used, or fibreglass insulation wraps. Ensure the insulation is rated for use with heat sources – it should be fire resistant (for example, many kits specify using fibreglass insulation because it won’t melt or catch fire from the heat tape’s temperature). Wrap or cover the pipe completely, then seal the insulation with tape so that moisture can’t easily get in. If your insulation lacks a weatherproof outer jacket and the pipe is outdoors or in a wet crawlspace, wrap a layer of plastic or vapor barrier around it to keep it dry.
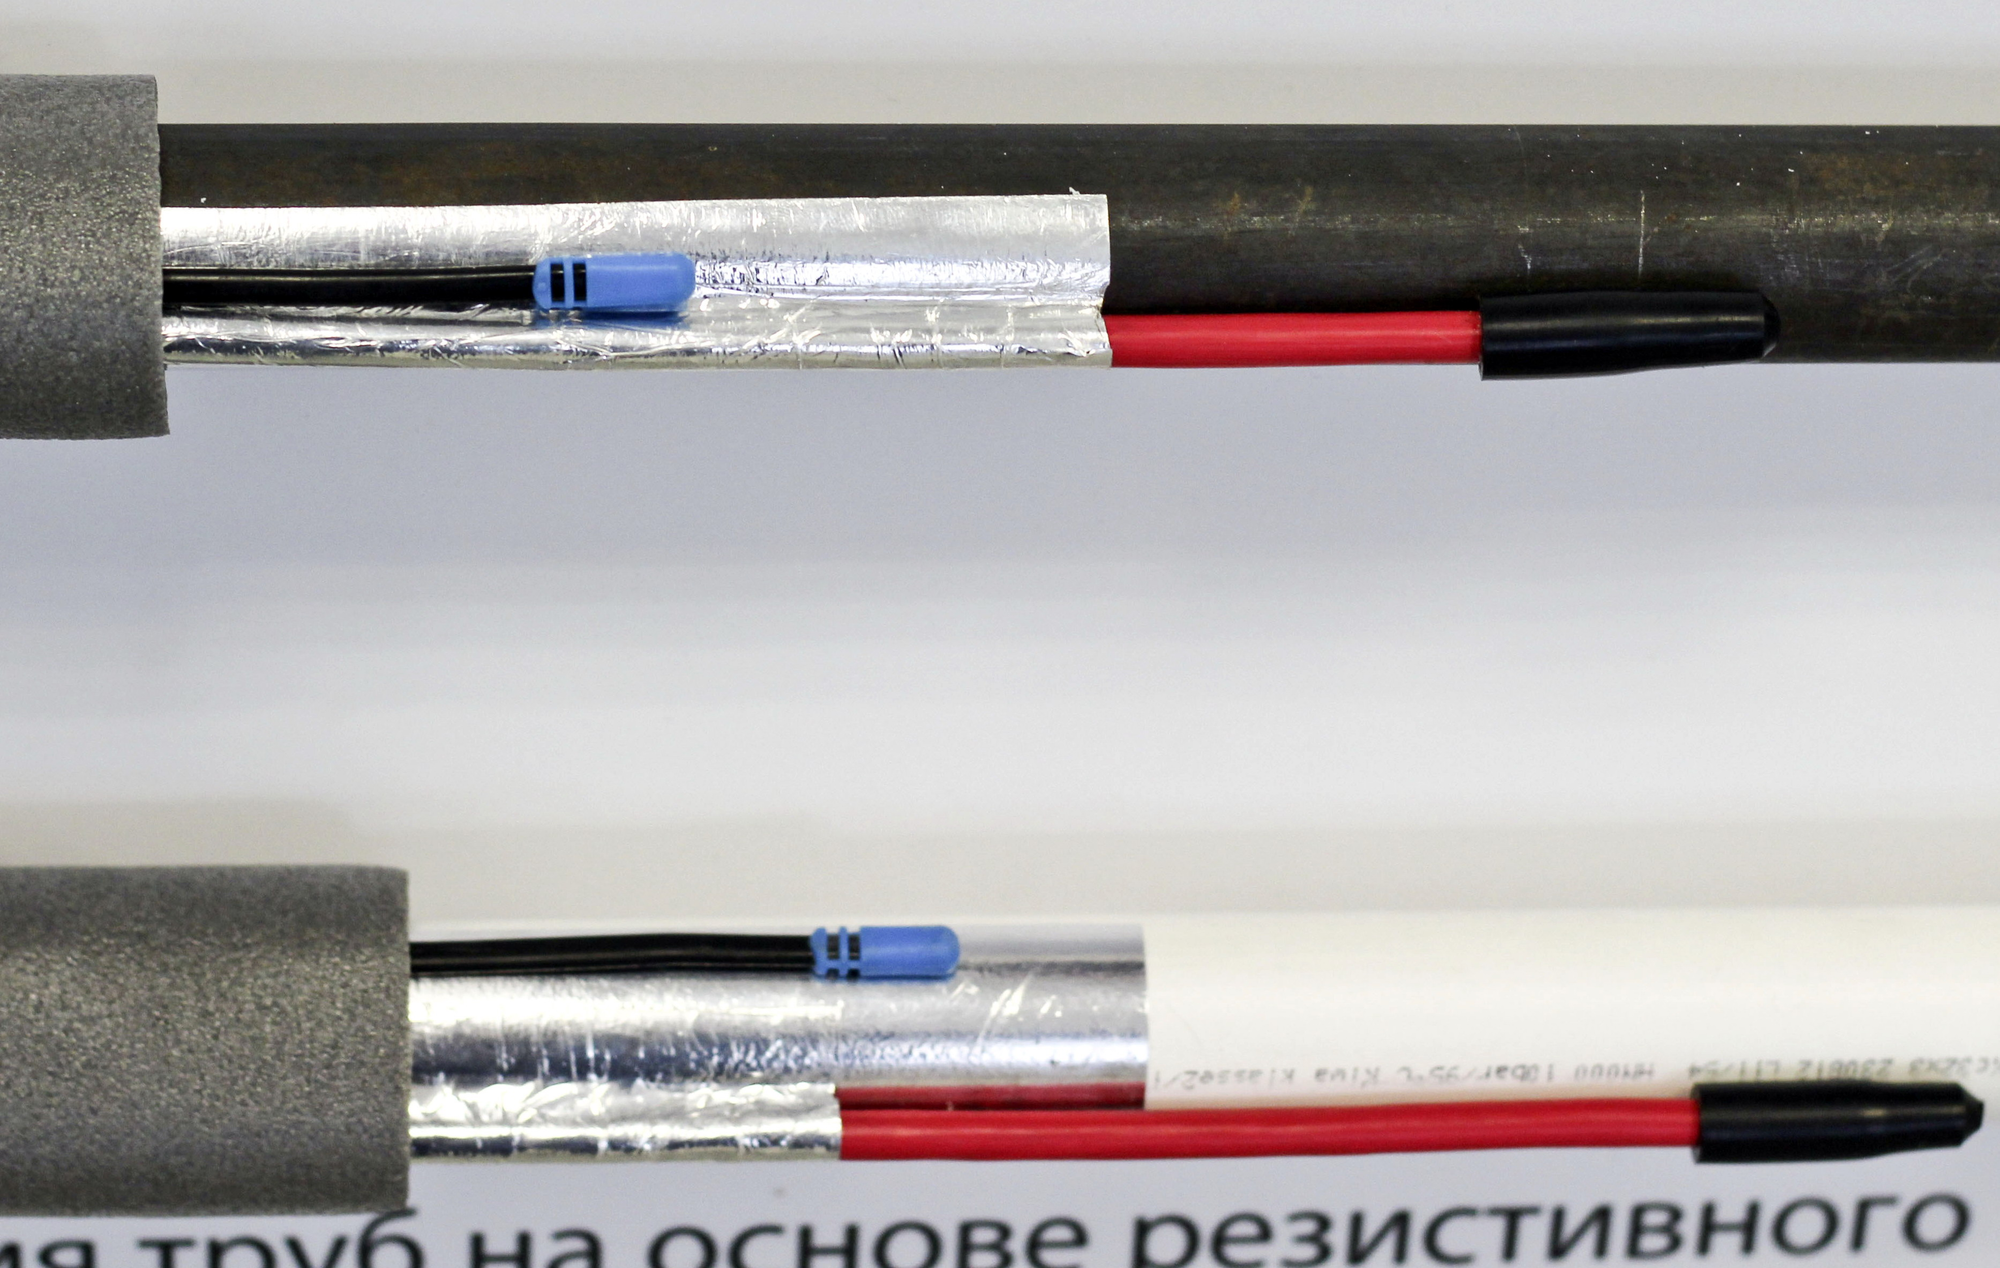
Example of heat tape (red cable) installed along pipes (one metal, one PVC) with foil and foam insulation. The blue sensor is a thermostat probe attached to the pipe. Always install the heating cable directly on the pipe surface, then add insulation over it as shown.
- Plug In and Power Up: Once everything is in place, it’s time to connect to power. Double-check that the outlet you’re using is GFCI-protected (this is critical for safety anywhere there might be moisture). If you’re not sure, test the outlet or have one installed. Do not plug heat tape into an extension cord if you can avoid it. Heat tape can draw a significant current over long periods, and cheap extension cords could overheat or pose a fire risk. If you absolutely must use one (for example, the nearest outlet is a few feet too far), use a heavy-duty outdoor-rated extension cord that can handle the amperage, and keep it as short as possible. With the tape plugged in, turn it on (if there’s a switch) or simply plug it in and it will start heating if conditions call for it. If the tape has a built-in thermostat and it’s not cold enough at the moment, it may not turn on until the temperature drops. Many kits have a little indicator light on the plug that glows when the tape is actually heating – a handy feature to confirm operation.
- Test & Verify: After a few minutes of being powered in cold conditions, you should be able to feel the pipe or the tape becoming slightly warm (it won’t be hot like a kettle, just gently warm). Carefully touch the pipe (not any exposed metal contacts) to ensure it’s heating. If it’s a thermostat model and it’s above the activation temperature, you might need to test it later when it’s colder. One trick: if the thermostat sensor is accessible, you can chill the sensor with an ice pack or a bag of snow to force it on, then see if the cable warms up. This lets you test it even if the weather isn’t yet below freezing. Once you’ve verified it works, you can rest easier. Leave the tape powered as long as freezing temperatures persist (more on when to turn it off in a moment). If anything doesn’t seem right – e.g., you see sparks, smell melting, or a GFCI trips – unplug it immediately and double-check your installation or consult an electrician.
By following these steps, you’ll have a nicely installed heat tape system protecting your vulnerable pipes. Next, let’s go over some important safety tips and common mistakes to avoid, because a poorly installed heat tape can be dangerous.
Safety Tips and Common Mistakes to Avoid
Heat tape is a great tool, but like any electrical device, you must use it safely. Here are some crucial safety tips and pitfalls to avoid:
- Never overlap or cross the heat tape on itself. This bears repeating because it’s the number one cause of heat tape failures and fires. Overlapping can concentrate too much heat in one spot. Unless a specific self-regulating cable says a small overlap is safe, assume no overlaps at all. Plan your installation path carefully to avoid crossing lines.
- Use the right tape for the job (especially on plastic pipes). If you have PVC or PEX pipes, use heat tape with a thermostat or a self-regulating cable. A constant-on cable without a thermostat can overheat plastic. Manufacturers explicitly warn that non-automatic tapes can damage plastic pipes if they overheat – and this risk is higher if the pipe is insulated. Following the product’s guidelines will keep you safe.
- Plug into a GFCI outlet and avoid cheap extension cords. Water and electricity don’t mix – a GFCI outlet will cut power instantly if there’s a short or moisture problem, potentially saving your cabin (and life) from a fire or shock. Heat tapes should always be connected to a GFCI-protected circuit. If you need an extension, use a heavy-duty one rated for outdoors and high wattage, and keep connections off the ground and dry. Never run thin indoor extension cords out to your pipes.
- Do not use metal attachments or pipe straps over the heat tape. Secure the cable with electrical tape or plastic ties. Metal bands or tape could cut into the cable or cause excessive heat spots. Also, don’t put insulation or anything else on top of a heat tape unless instructed – the tape should be directly on the pipe, not separated by other materials (you can insulate over the tape+pipe combo, but not sandwich stuff between pipe and tape).
- Keep combustibles away. Generally, heat tapes don’t get super hot – they’re designed to be just above freezing – but it’s wise to keep flammable materials (dry leaves, paper, sawdust, etc.) away from the area. Don’t run heat tape through insulation that is not approved for use with it (for instance, don’t snake it through loose fibreglass wall insulation or rest it on a wooden beam without proper pipe insulation around it). Treat it somewhat like a light bulb: not wildly hot, but enough to dry out or ignite very sensitive materials over time.
- Check your heat tape regularly. A big mistake is forgetting about the tape once it’s installed. Make it a habit to inspect the heat tape at least once a season (preferably once a month in winter). Look for any signs of wear: frayed insulation, chew marks (critters sometimes gnaw cables), burnt spots, or loose connections. If you find damage, unplug the tape immediately and replace it if needed. Heat tapes don’t last forever; their life expectancy can vary, and many should be replaced every few years or at the first sign of trouble. It’s cheaper to swap it out than to deal with a fire or burst pipe.
- Don’t ignore the manufacturer’s instructions. Every heat tape product comes with specific do’s and don’ts. For example, some require you to install the thermostat sensor exactly on the pipe (not dangling in air), or they specify a maximum length you can run. Following those instructions will cover specifics we can’t list exhaustively here. When in doubt, the manual is your friend.
- Turn it off or unplug in the off-season. When the weather warms up above freezing consistently, make sure to turn off power to your heat tape (unless it’s a self-regulating type that you plan to leave plugged in year-round – even then, many folks unplug to be safe). This prevents any chance of it running when not needed, saves energy, and gives you a chance to inspect it. We’ll talk more about seasonal use next.
Using Heat Tape: When to Turn It On/Off, Monitoring, and Maintenance
Installing heat tape is half the battle – using it correctly through the seasons is the other half. Here are some friendly tips on operating and caring for your heat tape in a cabin setting, particularly through Canadian winters:
When to turn it on
If you have a thermostat-controlled or self-regulating heat tape, you can simply plug it in at the start of the cold season and let it do its job. These types will automatically activate when the temperature drops to a certain point (commonly around 2–4 °C). For example, a built-in thermostat might turn the tape on when the pipe hits 3 °C and off when it rises above 7 °C. Self-regulating cables will start drawing power as needed when any section gets cold. If you have a manual (constant-on) heat tape without a thermostat, you’ll need to be more hands-on: start powering it on whenever freezing weather is imminent. In Canada, this might mean late fall when overnight lows dip below zero. It’s better to be proactive – turn it on a bit before the first hard freeze. Don’t wait until pipes are already frozen.
When to turn it off
In spring, once you’re confident the freeze risk is over (e.g. consistent daytime/nighttime temps well above freezing), you should turn off and unplug the heat tape. Running it in warm weather won’t benefit anything and just uses electricity (and in rare cases could overheat if it’s a simple constant ribbon). If a mid-winter thaw occurs (say you get an unusual warm spell for a week), you can unplug the heat tape to save power, but if there’s any chance temperatures will plunge again, you might just leave it on – especially if you’re not around to plug it back in. Some cabin owners with grid power simply leave the tape powered all winter and let the thermostat cycle it on and off. Those on generator power might be more sparing, only running it when absolutely needed.
Monitoring performance
How do you know it’s working? One easy way is to feel the pipe on a cold day; it should be cold but not frozen solid, maybe even slightly warm to the touch. If water is flowing normally when it’s well below 0 °C outside, that’s a good sign. You can also carefully feel the heat tape itself (it may feel lukewarm). Some heat tapes have an indicator light on the cord showing when they’re on – a quick glance at that is reassuring. If your tape has no light, you could plug it into a smart outlet or plug-in power meter to see if it’s drawing power. Another tip: if you have a remote thermometer, you could tape its probe to the pipe under the insulation to monitor pipe temperature from inside the cabin. In general, if you notice any issues like the water pressure dropping or slush in the line, check the tape immediately. But if installed and maintained well, heat tape usually quietly does its job.
Energy usage and cost
We touched on this earlier, but monitor how much energy your heat tape uses, especially if you’re concerned about the electric bill. As an example, 30 feet of heat tape at ~7 W/ft will use about 210 W when heating. If it ran 24/7, that’s about 5 kWh per day. In Ontario, for instance, 5 kWh might cost around $0.50 to $1 (depending on rates). Over a month, that could be $15–30 extra on your bill per tape. Self-regulating tapes might use less on average, since they idle lower when it’s not super cold. If you have multiple heat tapes (well line, grey water line, etc.), those costs add up. To save energy, use thermostat controls, insulate well so the tape doesn’t have to run as often, and switch off the tape during warm periods. Also, many Canadian cabin owners turn off the heat tape (and of course drain the pipes) if they’re leaving the cabin unattended for long mid-winter, just in case of power outages or to avoid running up the bill for an empty property.
Seasonal maintenance
At least once a year, do a full check-up on your heat tape installation. The best times are early fall (before the cold hits) and again in spring when you shut things down. In fall, inspect the entire length of the cable for cracks in the insulation, nicks, or wear. Critter damage is a common issue in remote cabins – mice might chew on the tape over summer. If you find any damage, replace the tape; don’t try to patch it with electrical tape, as tempting as that is. Verify the GFCI outlet is still functioning (test/reset it). If you left the tape on the pipe over summer, make sure nothing heavy was piled on it and that it’s still securely attached. Do a test run on the first cold day and feel that it’s working. Through the winter, periodically peek at any exposed sections or touch the pipe on very cold nights to reassure yourself it’s not starting to freeze. In spring, when you unplug it, you might gently remove any tape or ties that look like they’re about to give out and generally tidy up. Most people leave the heat tape installed on the pipe year-round (no need to unwrap it every spring), just remember to unplug it. Coil up any excess cord at the outlet (but again, do not coil the heating portion tightly around itself while it’s in use).
By following these usage and maintenance tips, your heat tape should last several seasons and continue to protect your cabin’s plumbing against the worst Mother Nature throws at it. Being attentive to it a couple of times a year is a small price to pay for the peace of mind that you won’t arrive at a frozen, busted pipe.

Final Thoughts
In the wild swings of Canadian weather, heat tape is a cabin owner’s best friend for freeze protection. It’s a relatively inexpensive and easy way to safeguard your water supply lines, drain lines, and any other vulnerable pipes. Remember, the keys are to choose the right type of heat tape, install it properly (no shortcuts on safety), and use it wisely with an eye on both protection and energy use. Whether you’re a new cabin owner worried about your first winter or a seasoned off-grid veteran looking for extra assurance, heat tape offers a practical, accessible solution.
With the information and tips in this guide, you should be well on your way to installing heat tape on your own. Stay safe, stay warm, and may your cabin’s plumbing weather every winter without a hitch.
Happy cabin living!


Join the Conversation